Before the development of Web 2.0 technology that allowed user-based modifications, people need to know HTML coding, CSS, JavaScript, Perl, CGI programming and other web-based programming languages to effectively design and maintain a website. It is either you learn these languages or you hire a website designer. You will also need a dedicated server to store and manage the data on your website.
One way of making a website more interactive is to include forms on your website. You can collect information from visitors or customers through these forms. Forms can now easily be created within just few minutes even if you do not have any knowledge of programming and markup languages. You do not even need to pay for a dedicated server to store the data that you will collect in your website. Here is an example of a form that I created with the help of Google Docs: YPEC sign-up form.
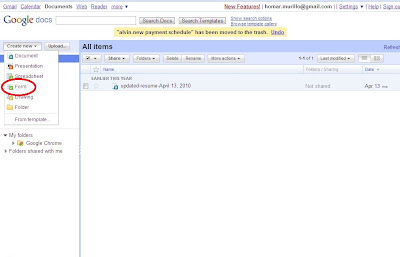
 STEP 2: Create new form by choosing "form" from the drop-down menu as shown in the illustration below.


Google forms can easily be created by following these steps:
STEP 1: Create a Google account. Sign-in to your account and click Google Docs.


STEP 3: Customize your form by typing the appropriate titles or questions in the text boxes.

STEP 4: Choose a theme from the available background options. Choose the most appropriate for your site. For example, you can choose the "garden" theme if you have a gardening or landscape design website.
STEP 5: Save the settings and generate the codes. Copy and paste the codes on the appropriate page of your website or blogsite.
Note: Every time a visitor fill-up the form on your website, the information will be automatically stored in your Google Docs account in Excel format, such as the Excel file shown in the illustration below.
